Gladiolus (Gladiolus), often called the skewer, has been cultivated as a garden plant for centuries. At the same time, the ancient Greek farmers considered this beautiful flower a field weed. He began to gain popularity a little later, when he attracted the attention of the Roman patricians. There they began to grow it as a garden decoration. It was the Romans who gave the plant its main name, meaning "sword". It was assumed that the amulet made from his bulb is able to protect the warrior during the battle.
Description of the gladiolus flower
The flowering plant gladiolus belongs to the Iris family. Africa is considered one of the places of origin, it is there that most of the wild species of this flower live. For a long time in the world, it was considered more of an edible than an ornamental plant - so in the Mediterranean countries, flour for flatbreads was prepared from its corms, combining them with ordinary onions. During the Middle Ages, bread was even baked from such flour.
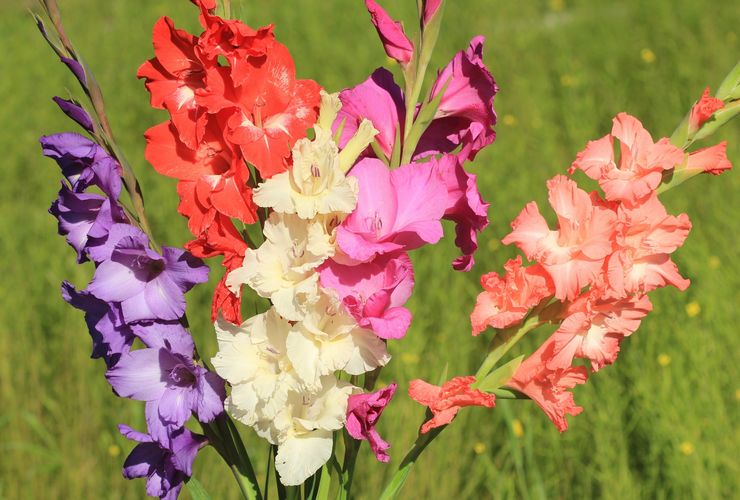
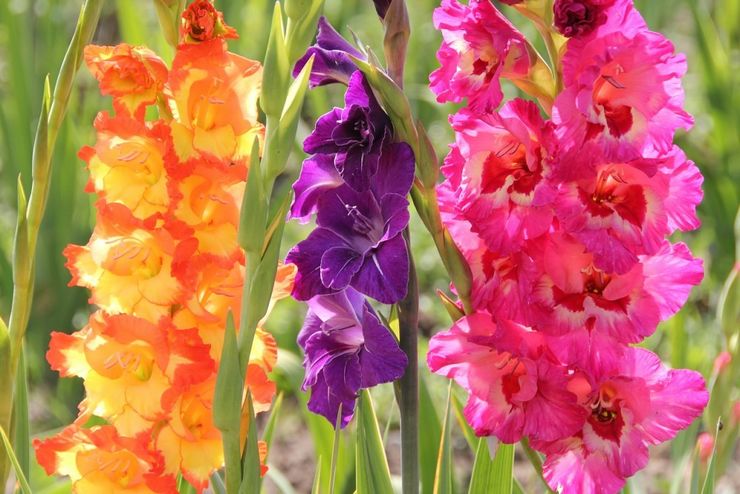
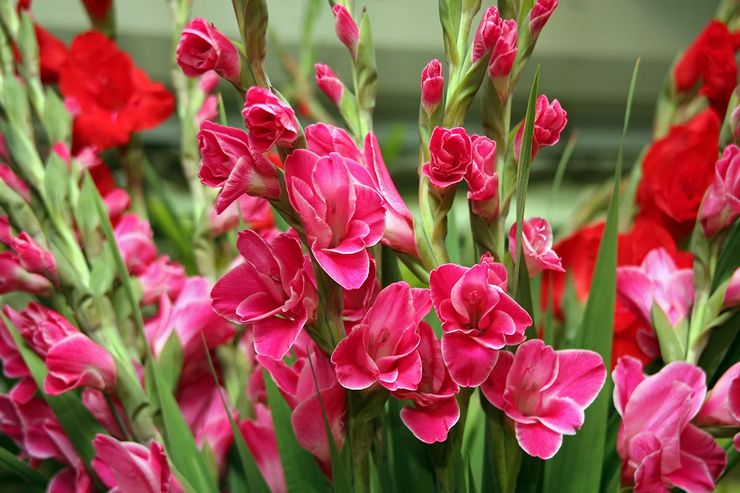
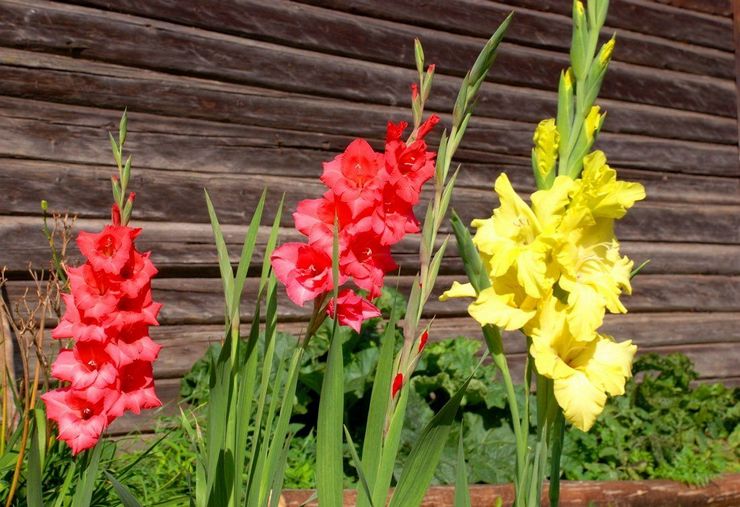
The real popularity of gladiolus came in the 16th century, when European gardeners became interested in it, and after the introduction of South African varieties - and breeders. Today he has several thousand garden hybrid varieties, differing in size, shape and timing of the appearance of flowers. Unlike many other flowering plants, gladioli boast an almost complete palette of possible colors, including pale green and burgundy black. The corms of a plant can also have a different color: they are yellowish, pink, almost white or very dark. At the same time, varieties tend to degenerate: most of them begin to lose their qualities after ten years of cultivation. They are being replaced by new, improved and even more spectacular specimens of gladioli. But there are also varieties that can exist for more than a dozen years without losing their durability and decorative effect.
Brief rules for growing gladioli
The table shows brief rules for caring for gladioli in the open field.
| Illumination | High, the flower needs bright sun. |
| Landing | Planting of gladioli is carried out in the spring. |
| The soil | Sandy loam, black earth or light loamy soil with a slightly acidic reaction (6.5-6.8 pH). |
| Top dressing | At the growth stage and before bud set, foliar is preferred. In the usual way, gladiolus is fertilized after the appearance of the first two, then 5-6 leaves, as well as before bud formation. You can use both organic and mineral formulations in liquid form. |
| Watering mode | Abundant weekly watering (at least 10 liters per 1 sq. M). In drought - a little more often. |
| Bloom | It lasts from the beginning of summer (in early varieties) and lasts until the arrival of autumn. |
| Digging out the bulbs | The bulbs should be dug up during the fall, before the onset of frost.This is usually done in the first or second decade of September. |
| Storage | Cool (about +7 degrees). |
| Pests | The main danger is thrips, but whiteflies, wireworms, bears, meadow ticks, slugs and cabbage moths can also harm. |
| Diseases | All diseases characteristic of bulbous, viruses, fungal diseases, bacterial infections. |
Features of growing gladioli
There are a number of basic rules for producing beautiful and healthy gladioli plants.
- When purchasing bulbs, you should only look for zoned varieties. Gladioli brought from warmer regions will not live long in a different climate. So Dutch specimens in middle latitude will be able to please with beautiful flowering for only one, the very first year. Very often small-flowered specimens grow from them.
- Gladioli should not be grown in one place for more than two years. After that, the plants should be moved to another area of the site. It is desirable that the composition of the soil in the new place differs from the previous one. You can change the drop-off site annually.
- The place chosen for planting must meet all the requirements of the plant, in addition, it depends on the climate. Gladioli prefer the sun, so it is undesirable to choose dark places for them. This rule especially applies to late varieties. Early varieties are able to withstand a slight partial shade, but the flowering time will shift slightly. In the northern regions, flowers can only be planted in a well-lit area.
- A flowerbed with plantings should be well ventilated. Such site selection will protect plants from the development of fungal diseases.
- Planting large bulbs along with small ones can harm the latter. Direct neighborhood with large specimens oppresses children. It is recommended to distribute the planting material on the garden bed in ascending order of size. The largest bulbs can be planted separately from the rest.
- 3-4 days before planting, dense scales should be removed from the baby bulbs: the sprouts may not break through them. After planting, such onions are watered every other day.
- The extent to which the bulbs are buried depends on the size of the bulbs and the quality of the soil. In light soils, the planting depth should be about four of its diameters, and in heavy soil, three will be enough. Insufficient depth will lead to the fact that the arrow will have to be tied up, and with excessive flowering, you can not wait at all.
- In summer, gladioli should be watered abundantly once a week. During a prolonged drought, slightly more frequent watering is required. After moistening, the soil around the bulbs should be loosened, the plantings should be earthed and all weeds should be pulled out.
- Flowers growing in sandy loam soil require regular foliar dressing.
- Preventive treatments for pests and diseases are recommended to be carried out monthly or twice a month. Preventing such problems is easier than curing plants.
- Timely removal of wilting flowers will preserve the strength of the bulb: thanks to this, it will not waste energy on the ovary.
- Proper digging and storage of gladioli bulbs is very important to maintain the quality of the planting material.
Planting gladioli in open ground
Preparing the bulbs for planting
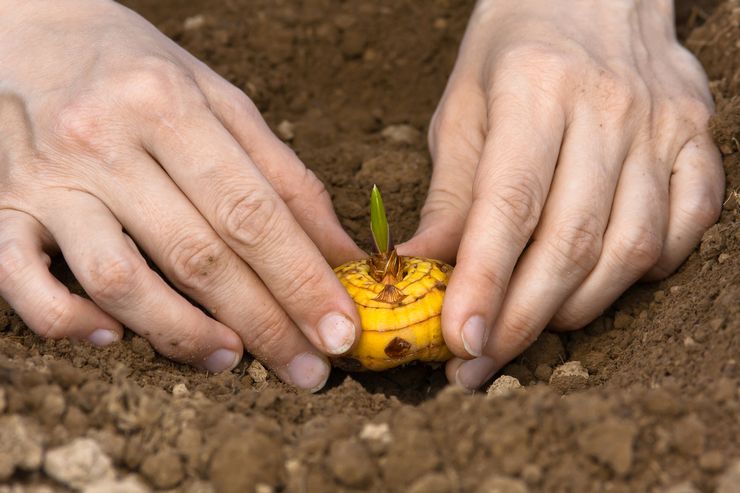
It is recommended to cook gladiolus bulbs for planting in about a month. Planting material is carefully inspected, choosing spoiled, dried or infected corms. A healthy bulb should be dense, have a glossy surface, root buds and a peaked bud. Small lesions should be removed by cutting off the affected area and treating the wound with greenery. The top layer of dense scales is removed from the selected bulbs. It is necessary to act carefully so as not to damage the sprouts. After that, they are transferred to a bright and warm room and laid out in rows upwards with sprouts. This will help germinate the bulbs that have not yet woken up.
Before planting in the ground, the planting material should be disinfected.Such a measure will serve as a prophylaxis against infection with fungal diseases, and will also be able to protect against thrips. You can hold the bulbs in a manganese solution for a couple of hours or in Fundazole for about an hour. If the disinfection procedure is carried out just before planting, half an hour of keeping the bulbs in a saturated solution of potassium permanganate will be enough. After that, the bulbs are dipped into the prepared wells.
Baby bulbs require special preparation. 2 weeks before planting, it is necessary to select buds with sizes from 0.7 cm. Varieties that are not large in size may have smaller buds. At the same time, each should have noticeable root tubercles - preferably several pieces. A dense top layer is removed from such children, and then they are freely placed in a cardboard box and placed in diffused light. To save time, instead of cleaning, such planting material must be kept in a weak manganese solution for about 10 hours. This will help both disinfect them and soften the hard shell.
Children can remain viable for about 4 years. The adult gladioli obtained from them are more resistant to the effects of diseases and are adapted to the growing conditions in a particular garden. It is this material that is considered the best for planting. Unlike store bulbs, which often already carry various infections, planting a baby gives a great guarantee of growing a healthy flower.
You can also get new gladioli using seed reproduction. Usually, breeders use this method: due to the peculiarities of the structure of the flower, it is most reliable to carry out artificial pollination to obtain seeds, choosing the right varieties for crossing. The pollination procedure is quite complicated, and the seeds quickly lose their germination, so they use this method only when necessary. For seedlings, seeds should be sown in February, after soaking them in a nutrient solution. A mixture of turf, humus and sand is used as a soil. The seeds do not need to be buried, but simply spread over the soil surface. Such seedlings can grow in boxes until autumn, or, with the onset of warm days, they can be planted in open ground. Before the autumn frosts, the formed small onions are dug up and stored in the same way as adult corms. If all the conditions are met, the plants obtained in this way should bloom as early as next summer.
How to properly plant gladiolus bulbs
Gladioli love warm and sunny places, so you need to choose an appropriate corner for them. An area with good drainage, light and protected from drafts is considered optimal. Shady areas have a bad effect on the development of the bushes, as well as on the timing and abundance of their flowering. It is especially important to avoid such planting sites in cold climates. In this case, the skewers will need especially a lot of light. Only residents of warm southern regions can place flowers in partial shade.
Not suitable for gladioli and places with close groundwater. Such conditions can lead to diseases of the corms. It is good if the flowerbed with them is located at a small angle to the south. This will allow the ground to warm up better, and the excess liquid will be able to go away faster.
The composition of the soil also plays an important role in the cultivation of gladioli. Slightly acidic soils with a pH of 5.6-5.8 are best suited for it. More alkaline soils prevent the bulbs from absorbing iron compounds, which causes the foliage of plants to turn yellow. Too acidic soils lead to darkening and subsequent drying of the tips of the leaves. In addition, it is in such a soil that flowers most often get sick with fusarium. To make the soil less acidic, chalk, shells or dolomite flour are added to it. For processing 1 sq.m. the territory will require about 200 g of the composition.
Optimal for growing gladioli are chernozems, light loams and sandy loam soils.Too light sandy soil can be made heavier with the help of clay and humus, and, on the contrary, sand is added to heavy loams and everything is carefully dug up. Gladioli grow well in the place of herbaceous perennials, vegetables and legumes. But the beds where potatoes, beets, other root crops or asters grew are not suitable for them.
The time of digging up the soil for the future flower bed depends on the weather of a particular region and the position of the site. If the ground on it warms up quickly, you can dig up the beds shortly before planting. In arid places, it is recommended to dig up the soil in the fall, simultaneously introducing the necessary minerals into it. Superphosphate (about 100 g per 1 sq. M) is often added to the soil, as well as potassium chloride (up to 40 g per 1 sq. M). Before the spring planting of gladioli, the soil is only slightly loosened. In spring, potash fertilizers that do not contain chlorine can be added to the soil.
The planting of gladioli bulbs begins from the end of April to the second half of May, trying to be guided by the weather. The width of the finished beds is usually at least one meter. If the flowers are arranged in several rows, there should be about 25 cm between the flowers. The distance between the individual bulbs depends on their size. For small specimens, 7-8 cm will be enough, for large ones - 15 cm. The depth of the holes should be approximately the same. For small ones, it is at least 8 cm, for large ones - at least 10 cm, but not more than 15 cm.
Moisten the soil before planting. Instead, you can spill the rows with a phytosporin solution. To create drainage, a sand layer a couple of centimeters thick or a small layer of sphagnum moss is laid on the bottom, which helps to retain moisture in the soil and protects the planting from rot. After that, the bulbs are laid out on the ground and buried. To stimulate germination, you can cover the beds with a film, forming a kind of tunnels from it with the help of flexible or arcuate supports. Due to such a shelter, it is possible to protect early plantings from recurrent frosts.
Outdoor gladioli care
For normal development and lush flowering, gladioli require appropriate care. When the bulbs germinate and the leaf size reaches 10 cm, the bed should be mulched. The layer thickness can be up to 7 cm. Usually chips are used for this, but it is better to use humus. It will protect plantings from overheating and dryness of the soil, drown out weeds, and also serve as an additional source of nutrition for flowers.
Watering mode
Before watering the plantings of gladioli, small furrows up to 5 cm deep should be made between the rows, where the water will flow. This step will prevent water droplets from entering the foliage. Usually gladioli need one plentiful (up to 12 liters per 1 square meter) watering per week, but on dry days this is done much more often - once every 3-4 days. More rare soil moisture will lead to drying or deformation of the flowers at the top of the arrow. Watering is best done in the early morning hours or not late in the evening, so that the foliage can probably dry out before nightfall.
After each watering, it is recommended to loosen the soil around the bushes to a depth of 6 cm. This is done so that a crust does not form on the ground. After loosening, the bushes are spud. This procedure must be repeated at least once every 10 days, regardless of the amount of precipitation.
In extreme heat, thrips can attack plants. To protect the flowers, at the first sign of a pest, their leaves should be sprayed with infusions of garlic, makhorka or an insecticide. Sometimes the treatment is combined with the introduction of fungicidal agents for the prevention of viral diseases.
Garter
When the arrow grows to a sufficient height and buds begin to appear on it, especially tall peduncles should be carefully tied to the pegs. You can stretch twine between the rows.
Weeding schedule
Weed removal is considered a must when growing gladioli.Usually 4 weeds will be enough per season. This step is especially important at the stage of bulb germination: weeds can quickly drown out all plantings, which is why gladioli cannot bloom later.
During the growing season and flowering, the flower bed should also not be started. A large number of weeds often leads to the development of diseases.
Top dressing
The composition of mineral supplements depends on the growth stage of gladioli. When the bulb releases the first 2-3 leaves, nitrogen must be added to the soil so that the foliage has a healthy, rich color. It can be urea, ammonium sulfate or ammonium nitrate at the rate of 25 g per 1 sq. M. In feeding, it is important to observe the measure: an excess of nitrogen supplements will lead to a strong overgrowth of greenery to the detriment of flower development. In this case, plant immunity will decrease.
The second feeding is usually carried out when the 5th or 6th leaf grows in the gladiolus. In addition to nitrogen, the composition of fertilizers should include potassium and phosphorus, which are responsible for the formation of a flower arrow. You can add ammonium sulfate, superphosphate and potassium sulfate to the soil (each - up to 20 g per 1 square meter).
The third time the flowers are fertilized immediately after the flower stalks appear on the bushes. For this, formulations containing only phosphorus and potassium compounds are used. You can use up to 40 g of superphosphate and about 15 g of potassium chloride. In addition, mineral fertilizers throughout the entire growth period can be applied foliarly, wetting the leaves on both sides. Usually, a solution of boric acid (0.15 g per 1 liter), copper sulfate (0.2 g per 1 liter) or potassium permanganate is used for this. Usually, such dressings are also combined with the main stages of flower growth.
In addition to mineral fertilizers, organic fertilizers can also be applied. It is best to use infusions and solutions: the liquid form promotes better absorption of nutrients. At the vegetation stage, the bushes are fertilized with a solution of poultry manure. To do this, you need to dilute 30 liters of droppings in 50 liters of water, and then leave for at least 10 days. The resulting mixture is diluted in a ratio of 1 liter of infusion to 10 liters of water and the grooves made for irrigation are poured into it. It is not recommended to use horse manure.
In the second half of August, gladioli stop fertilizing. Otherwise, the internal mode of the bulb can be disrupted.
Cutting flowers
Arrows of gladioli are often used to create bouquets: the flower stands well in the water and retains an elegant look for up to 10 days. In addition, timely removal of the arrow will help preserve the vigor of the plant as well as removing old wilted flowers.
In order not to harm the bulb, you need to cut the peduncles correctly. This is done early in the morning or in the evening using a sharp and pre-sterilized instrument. Without it, it is better to carefully break off the arrow: a dirty knife or pruning shears can infect. The remaining tip of the arrow should be hidden between the leaves to keep rainwater out. In this case, at least four leaf plates should remain on the plant.
Usually, arrows with half-open buds are chosen for cutting - they stay longer in the water. But in varieties with dense corrugated petals, at least two lower flowers should have time to open.
Digging and storing gladiolus bulbs
When to dig up bulbs
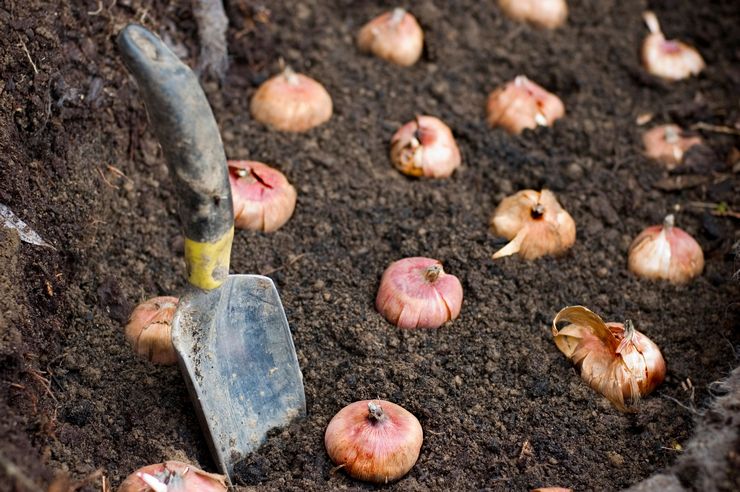
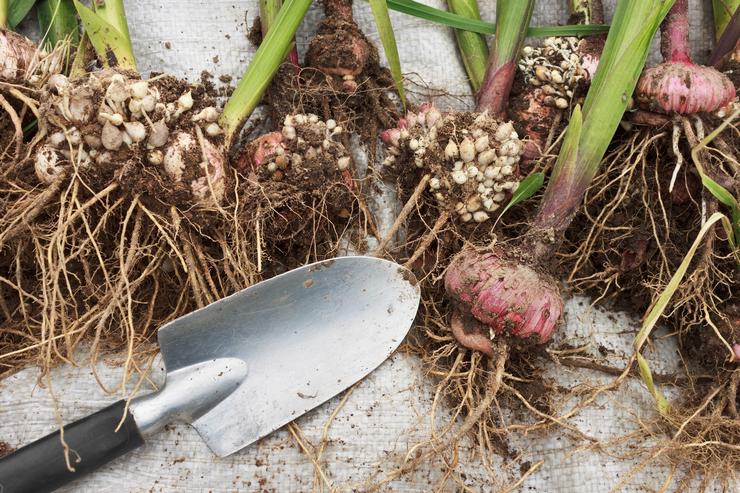
It is necessary to dig the bulbs of gladioli from the ground in the fall, while after flowering it should take about 1-1.5 months. It is not worth delaying harvesting - a long stay in cool soil can lead to the development of diseases. Usually, a dry and clear day in mid or late September is chosen for the procedure. Onions ready to dig out are covered with dense scales. The same applies to children, who should effortlessly separate from the mother's corm. In order for the foliage not to interfere with the process, you can first cut off all the stems. You don't need to leave the stumps. Sometimes the leaves and stems are cut off after digging, at the same time removing the roots from the corms. Rotten or moldy specimens must be thrown away.
The early and large varieties of gladioli should be excavated first, and only then the later and small ones. If we are talking about plants, on the leaves of which signs of infection have appeared, early digging and timely processing can save them from complete death. From the bulbs pulled out of the soil, they shake off the earth and separate the formed children. Then all the bulbs should be divided into varieties, put in containers with a fine grate at the bottom and rinsed thoroughly in running water.
The washed corms should be disinfected by holding for about half an hour in a 1% Fundazole solution. After that, they are washed again and processed again - now in a saturated solution of potassium permanganate. After such procedures, the bulbs are dried for a couple of days, and then tidied up in boxes lined with paper. For the first couple of weeks, they should be stored in a warm (from +25 degrees) place, while they should be periodically turned over. Then the boxes are removed to a slightly cooler (about +20 degrees) corner. After a month, you can carry out the final cleaning and sorting, removing too dirty scales and separating the remaining children. By this time, the corms have time to dry out thoroughly, and a cork layer is formed between the mother specimen and the baby.
Children should be stored in a pre-sorted variety and size. Children are considered large about 0.8 cm in diameter and above, medium - from 0.6 mm. They should be stored in paper bags at a temperature of about +5 degrees. Staying in a warmer room can negatively affect their spring germination. If there is no suitable corner in the house, you can place them in the refrigerator.
Bulb storage requirements
Gladioli bulbs have a pronounced dormant period, but it does not last long - only about 40 days. At this time, sprouts will definitely not appear on them, even if the planting material is in a warm room. The main task of the gardener is to try to delay the moment the sprouts appear until the time of planting. For this, the gladioli bulbs need to be kept cool. The optimal room for their maintenance is considered to be a room where it is kept no higher than +10 degrees with an average humidity level (up to 70%). This can be a ventilated cellar or basement.
Bulbs can be kept in mesh boxes, cardboard boxes, plain paper bags, newspapers, breathable canvas bags or even tights. The main thing is that they receive an air flow. For preservation, it is advised to add peeled garlic cloves to containers with bulbs. They should be checked for rot at least once a month, and old garlic should be replaced with fresh one.
If there is not enough cool space, the gladioli bulbs should be placed in the refrigerator. Usually the lowest vegetable shelf is chosen for this. Each onion is pre-wrapped with paper and placed in sealed containers. This will help protect the planting material from drying out. As spring approaches, the bulbs may begin to wake up and release moisture. To prevent them from rotting, you need to periodically pull them out, dry them, wrap them with fresh paper and put them back. During this period, you can move the containers to cooler shelves.
In southern regions, where winters are quite mild, gladioli bulbs can be stored on frost-free balconies in boxes mounted on wooden planks. In cold weather, the boxes with them can be additionally wrapped in old warm clothes.
In the most extreme case, gladioli bulbs can be stored at room temperature, but under these conditions, by the spring they will begin to lose moisture and dry out. Before planting, such corms must be kept in a growth stimulant solution.